
 HDSLR video is a great way to get high quality footage on a micro budget; and a great way to keep that budget micro is to be picky about what accessories are right for your setup. I recently received an email question focused on this and–in particular–if I had to choose between the Rode Stereo Videomic or the Zoom H4n, which would I use? So here’s a little background on my thinking…
1. Cost. They cost roughly the same amount, and I use both on a regular basis, so the question is a tough one.
2. The Rode. I recently did a blog post about the Rode Mic a few months ago. You should read it, but to summarize; I love the thing for its straight forward simplicity. It allows me to just shoot and not worry about sound, but…
3. The Zoom. …When I DO need to worry about the sound (such as an interview or a scene in a narrative film) I bust out the Zoom H4n. It captures better files that the straight camera – remember it’s sole function is audio.
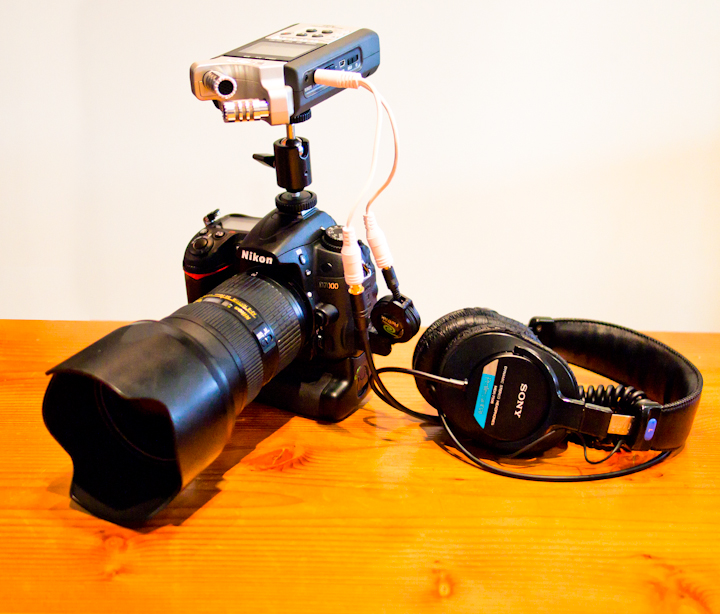
So, while my preference is to have both, if forced to chose one, I would buy the H4n. Here’s why: with a little hack, spending a little more cash and buying one extra cable plus a hot shoe adapter you can turn the Zoom H4n into a badass on-camera mic. Here’s how:
First, get a hot shoe adapter like this one and mount your H4n on top of your camera.
Second, plug this line-out splitter into the headphone jack of the H4n and plug the male end of it into the mic input on your camera. Now your camera will record what the H4n’s microphones are picking up and your H4n will record a high quality, AGC (automatic gain control) free backup file.
Third, you can even monitor what the H4n is recording with 1/8” headphone jack on the fancy new cable you bought.
Lastly, an important tip. Make sure the H4n is recording! It’s easy to forget to start your audio recorder when the director just yells “Roll camera!”.
This is a little more of piecemeal one-man-band kinda setup than using just a microphone like the Rode, so make sure you’re familiar enough with your equipment to make it work properly without slowing down the production while you make adjustments. You’ll probably be in the role of be being audio guy and camera guy, so make sure to practice to get good at both.
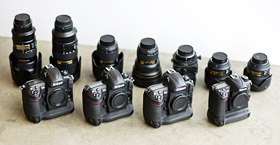
Here’s an enlarged image of the thumbnail above, highlighting the cabling. Keep in mind that these cables were purchased at RadioShack a while back just to test out my original hack job/experiment. If you buy the cables I linked to above from B&H, your setup will look much slicker than this first attempt pictured here.

Here’s a picture of my setup with cables purchased at RadioShack. If you buy the cables I linked to above, your setup will look much slicker than mine.


Hi there,
another solution is the JUICEDLINK DT454 you will have everything you need, plus two sound source monitor and mix directly!
It’s a little bit ( 🙂 ) more expensive, but sooooo good!
D.
There’s also the Zoom H1 as a lower cost solution for on camera recording or plugging in the Rode VideMic (or a lapel mic).
Pros:
-Cheaper
-Lighter
-Smaller (plug in a lapel mic an put the record in the talent’s pocket)
Cons:
-Wind & handling noise
-Lots of plastic (but makes it lighter)
-Only one microphone input
-No xlr inputs or phantom power for mics that need it
It’s funny, what Eric wrote is pretty much the exact same path I chose, recorder first then mics later. The external recorder improves quality, bypasses AGC (very important on a 7D) and adds a lot of flexibility to the system, plus has a mic so you can start recording straight away. After the H1 I picked up a lapel mic then a second hand VideoMic on ebay and soon a booming set-up for the video mic because you NEED to get close to get good audio, whatever you are recording with.
I reasoned through it the same way you did and came up with the H1n. I find it picks up a lot of handling noise though, even with a DIY shockmount. Have you found a way to minimize handling noise on-camera?
Zoom H4N Cradle is a good product for doing quick setups and being able to switch out the batteries. There are imperfect paint cradles for a lot less money as well.
I’m confused, when would you ever have a Director, but not a Sound guy? Part of the problem with this entire setup is that you’re creating another Camera Mic and recording it, while you’re still not getting good sound by mic’ing the talent in some way. This is a setup for when audio doesn’t even matter, if it does, get yourself a Sound Guy or at least real audio equipment.
I’ve been on a ton of shoots where there was a director and no sound guy, or there was a videographer pulling double duty as camera/sound guy. I don’t recommend it, but it happens sometimes when the budget is low or the crew needs to be lean. If you’ll re-read the first sentence of this post, you’ll be see that it’s about saving money.
Also, this setup doesn’t stop one from using additional microphones with the Zoom H4n. It has XLR inputs.
A ton of shoots that aren’t sound critical, yes. And that’s not a “Director”, that’s some sort of Producer.
Bottom line is this, if you’re not putting a mic on somebody, you might as well just use the camera mic, that will save your budget a LOT of money.
If you want better audio, buy a good wireless or shotgun and feed it straight into the camera (ones that don’t have auto gain).
If you want to go a step further, THEN feed that mic into the H4n or the like and sync sound in edit.
All I’m saying is that the above is adding stuff to the camera for no reason (unless you’re using a model with only auto gain).
Ideally you should be getting your microphone much closer to your subject, but when you can’t on camera works alright. In theory a shotgun mic should work better from the camera’s distance than the H4n… Haven’t compared the two though.